Showing posts with label facebook hacking tricks. Show all posts

Friday, April 21, 2017

How To Change Name On Facebook Before 60 Days After Limit – 2017

How To Change Name On Facebook Before 60 Days After Limit – 2017


How To Change Name On Facebook Before 60 days After Limit
Facebook is best place to interact with friends by chatting or using other activities. Facebook is also best way to spend extra time online. We can easily know what is in the trend and going viral. Basically we use Facebook to share status, images and our memories. But to use Facebook we need to add some personal information which is required by Facebook to make user experience better. We add personal details like bio, status, date of birth and use our name on the profile. So that, it will easy for someone to find us on Facebook.
Every Facebook user has an intention that we want ours friends to give their comments, likes on our status and photos. In the same way we use different types of names to our make profiles unique and attractive. As we already posted trick about single name on Facebook Which is working great from a long time. But the problem which we face on Facebook is, We are not able to changes name on Facebook after 60 days limit. Facebook also provides official form to Change Profile Name After crossing limit. But the new issue on Facebook is that we are not even able to change name on Facebook before 60 days once we do it.

How To Change Facebook Name Before 60 Days Limit.

  • First of all, go to ‘Account settings’ and click on ‘Edit name’ and confirm that Limit is currently present or not.
  • If the limit will be present Name will not be clickable and there should be a note about name change limit Which looks like.
YOU CAN’T CHANGE YOUR NAME RIGHT NOW BECAUSE YOU’VE ALREADY CHANGED IT WITHIN THE LAST 60 DAYS. LEARN MORE.
  • After checking out limit if you want to continue to change name then Click Here
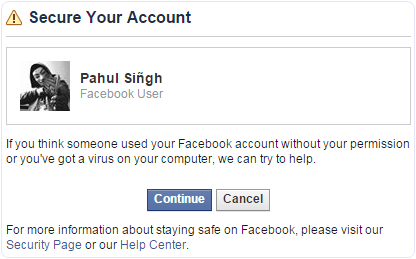
  • Click on the Continue Button. This link is actually for securing and recovering account from hacking. So we will use it to recover our account and it will let us to change name in further steps.
Facebook account recovery to name change
  • Change your Account password and but you don’t need to change any other information like email, mobile no etc.
  • After continuing they will show that you have recently changed your account name.
  • Then all the previously used names will displayed and select any of the listed name available there.

Thursday, April 20, 2017

How to Send, Share Or Post Blocked Links On Facebook

Facebook is the largest social networking site on the internet. It has the largest active user data base all around the globe. People are hooked to Facebook due to its various features like updating status, uploading images and videos, going live, chatting on messenger, and many more. People can share to a huge audience as well. Because of a large active user base, Facebook has become a very important tool in the advertisement industry. Apart from all this, Facebook takes a keen eye on security. It has taken major steps to protect privacy of users as well as filter out harmful content on Facebook. One such step Facebook has taken is by blocking spam or malicious links. Facebook bots continuously monitor the links people share on Facebook or send in messages and blocks the ones that may be malicious or spam. But, sometimes, a link that is legit gets blocked by Facebook. This can be annoying if Facebook is your main platform for communication. Hence, people look for a way to send/post blocked links on Facebook. If you are also looking for a working way to send, post and share blocked links on Facebook, you are on the right spot. Here, we have shared a simple step by step guide on how to send, share or post blocked links on Facebook.

How To Send, Share Or Post Blocked Links On Facebook.

Given below is easy to follow step by step guide on how to send, post or share Blocked Links on Facebook. Follow the steps carefully.

Method 1:- Requesting Facebook For Unblock.

If you believe that a link is wrongly blocked by Facebook, and you believe it must be unblocked by Facebook, you can use this method to request Facebook to do so.
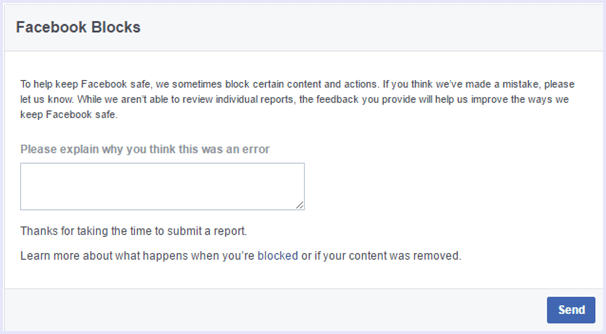
Here is the link to the form where you can submit a request in order to unblock your link on Facebook. Give a proper description for better support.
facebook blocks

Method 2:- Using Blogger URL Redirection Trick.

Here is a quick guide to using Blogger in order to send blocked links on Facebook.
Steps To Send, Post, or Share Blocked Links On Facebook:
Step 1. Click Here to head to Blogger.com and log in using your Google account.
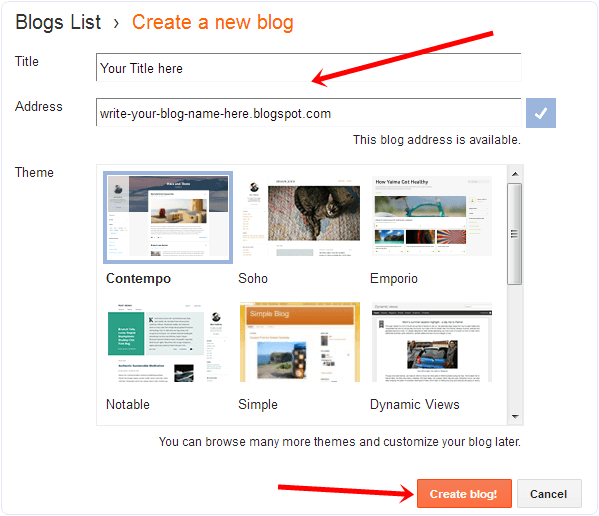
Step 2. Then, click on “Create new Blog” and create a blog using the URL of your choice. It is completely free.
create new blogger blog
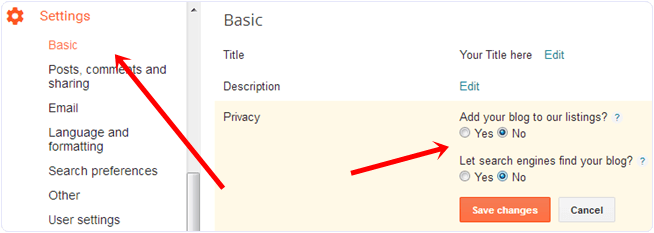
Step 3. Once your blog is created, go to Settings, and select NO in “Let search engines find your blog?”. Then click Save Changes.
blogger blog basic privacy settings
Step 4. Then, head to the template option, and click on the settings icon under mobile section. Here, select “No. Show desktop template on mobile” and click save.
Step 5. Scroll down and click on “Revert to Classic Template” under the heading.
revert blogger blog to classic template
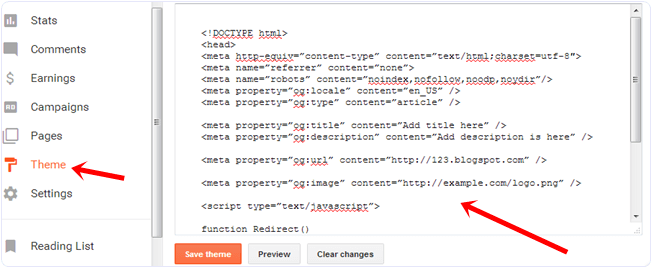
Step 6. On scrolling a bit more, you will see an “Edit template HTML” where you need to enter the code given below.
<!DOCTYPE html>
<head>
<meta http-equiv=”content-type” content=”text/html;charset=utf-8″>
<meta name=”referrer” content=”none”>
<meta name=”robots” content=”noindex,nofollow,noodp,noydir”/>
<meta property=”og:locale” content=”en_US” />
<meta property=”og:type” content=”article” />
<meta property=”og:title” content=”Add title here” />
<meta property=”og:description” content=”Add description is here” />
<meta property=”og:url” content=”http://123.blogspot.com” />
<meta property=”og:image” content=”http://example.com/logo.png” />
<script type=”text/javascript”>
function Redirect()
{
window.location=”http://blocked_url.com“;
}
setTimeout(‘Redirect()’, 1);
</script>
<title>Loading…</title>
</head><body></body></html>
paste redirection code on blogger blog
Step 7. Here in this above code, replace the “http://blocked_url.com with the blocked URL that you want to send.
Step 8. Click on Save Changes to save the template.
And it’s done. Now you can share the blocked URL with anyone on Facebook using the URL of your blog. You can edit the template anytime to change the URL that you wish to share.
In conclusion, this is the best and easiest way to share, send or post blocked URL on Facebook. We hope you find this guide user-friendly. Share your experiences in the comments below.